AI art with Stable Diffusion in Python
Background
Stable Diffusion is a text-to-image model trained on 512x512 images from a subset of the LAION-5B dataset. You can implement this model on your own computer using the Python Diffusers library, which is a library for state-of-the-art pre-trained diffusion models for generating images, audio, and 3D structures. It is hosted by huggingface. The workings of the library are beyond the scope of this post, there are guides here if interested. To make this work fast enough you should have a reasonably modern graphics card. There is also a GUI that allows you to use Stable Diffusion in a GUI if you don’t want to use Python.
Install
You can install everything with pip. It’s recommended to create a virtualenv for this. Note that exact install process will possibly change over time.
pip install -q diffusers==0.14.0 transformers xformers git+https://github.com/huggingface/accelerate.git
Code
import os, glob
import random, math
import numpy as np
import pandas as pd
import torch
from diffusers import StableDiffusionPipeline, EulerDiscreteScheduler

model_id = "stabilityai/stable-diffusion-2-1"
#model_id = "CompViz/stable-diffusion-2"

# Use the Euler scheduler here
scheduler = EulerDiscreteScheduler.from_pretrained(model_id, subfolder="scheduler")
pipe = StableDiffusionPipeline.from_pretrained(model_id, scheduler=scheduler, torch_dtype=torch.float16, safety_checker=None)
pipe = pipe.to("cuda")
We can then call the pipe object to create an image from a text prompt. The prompt function below is a convenient way to make multiple images at once and save them to the same folder with unique names. Prompts are a hit and miss process so you will find yourself discarding a lot of images to get the one you might want.
def prompt(prompt, n=1, style=None, path='.', negative_prompt=None):
    if style != None:
        prompt += ' by %s'%style
    if negative_prompt == None:
        negative_prompt = 'disfigured, lowres, bad anatomy, worst quality, low quality'
    for c in range(n):
        print (prompt)
        image = pipe(prompt, negative_prompt=negative_prompt).images[0]
        if not os.path.exists(path):
            os.makedirs(path)
        i=1
        imgfile = os.path.join(path,prompt[:90]+'_%s.png' %i)
        while os.path.exists(imgfile):
            i+=1
            imgfile = os.path.join(path,prompt[:90]+'_%s.png' %i)
        image.save(imgfile,'png')
    return image
Examples
prompt('flowers',style='Alfred Sisley',n=5,path='test')
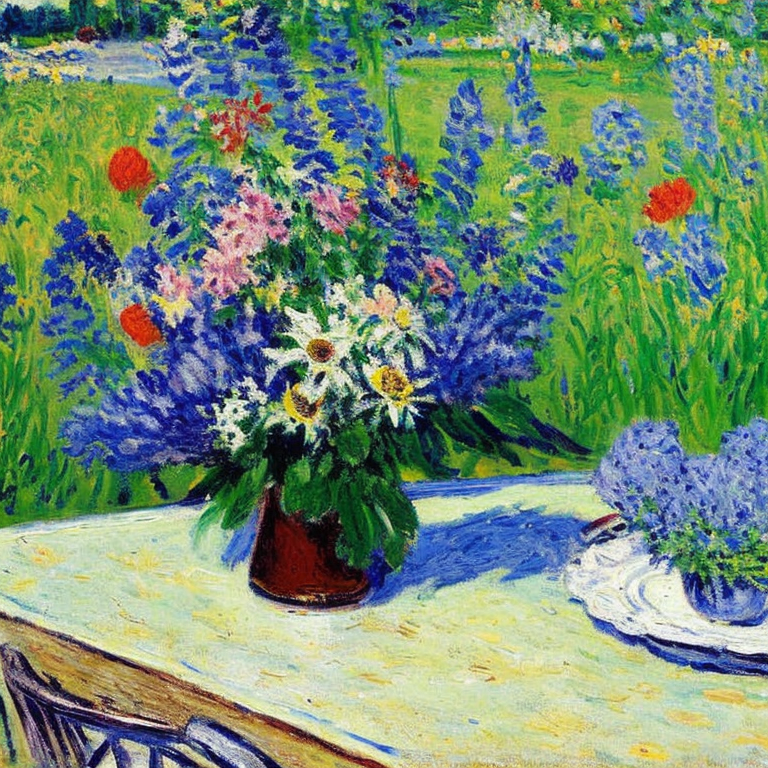
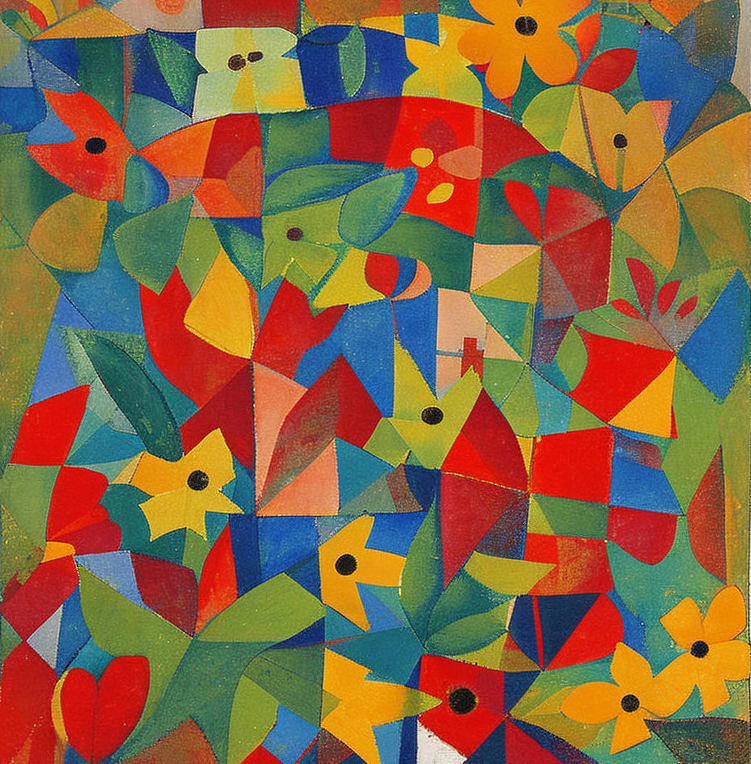
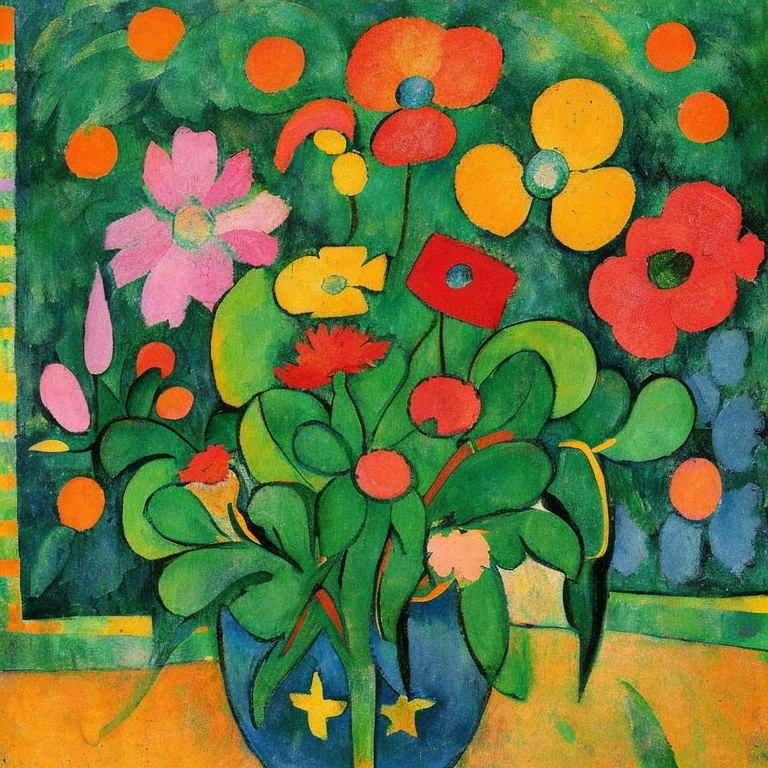
We can use the style of many artists and even combine them as shown below. Sometimes the picture will be a quite obvious combination of the two styles.
"flowers, style of Paul Klee"
"flowers, style of Paul Klee & Paul Cezanne"

"flowers, style of Monet & Paul Cezanne"
Other examples
Stable diffusion can often be used to capture the likeness of well known people, depending on how well trained it has been on that person. Here is an example of a famous actor:

Sometimes the style of the artist overwhelms the subject and you get a totally unexpected image. I added the word ‘impressionist’ to the prompt to get it to make paintings of Mr. Spock.

Finally to give an illustration of the breadth of styles that can be used to deptict one subject, here’s some pictures of Elvis:

Here are some styles/media to try in the prompts. You can find lots of web pages with more detailed guides.
"linocut"
"crayon drawing"
"pencil"
"engraving"
"risograph print"
"illustration"
"pen and watercolor"
"oil"
"pen and ink"
"3D model"
"analog film"
"anime"
"cinematic"
"craft clay"
"digital art"
"fantasy art"
"isometric"
"line art"
"lowpoly"
"neonpunk"
"origami"
"pixel art"
"texture"
"papercraft collage"
Grid image code
Here is the code for putting multiple images in a grid as used above. It may be of use elsewhere.
def tile_images(image_paths, outfile, grid=False, tile_width=300):
    """Make tiled image from folder. Assumes images are the same size."""

    from PIL import Image, ImageDraw
    images = [Image.open(path) for path in image_paths]

    ratio = images[0].height / images[0].width
    tile_height = int( tile_width * ratio )
    num_rows = int(math.sqrt(len(image_paths)))
    # Calculate number of cols
    num_columns = (len(images) + num_rows - 1) // num_rows

    tiled_width = num_columns * tile_width
    tiled_height = num_rows * tile_height
    tiled_image = Image.new("RGB", (tiled_width, tiled_height))

    for idx, image in enumerate(images):
        row = idx // num_columns
        col = idx % num_columns
        x_offset = col * tile_width
        y_offset = row * tile_height
        tiled_image.paste(image.resize((tile_width, tile_height)), (x_offset, y_offset))
    if grid == True:
        draw = ImageDraw.Draw(tiled_image)
        # Draw borders around each tile
        for row in range(num_rows):
            for col in range(num_columns):
                x1 = col * tile_width
                y1 = row * tile_height
                x2 = x1 + tile_width
                y2 = y1 + tile_height
                draw.rectangle([x1, y1, x2, y2], outline=(0, 0, 0), width=3)

    tiled_image.save(outfile)
    return tiled_image
We can use it like this:
files = glob.glob('images/*.png')
#get a nxn sample if needed ,i.e. 4, 9, 16
x = random.sample(files, 9)
tile_images(x, 'tiled.png', grid=True)