image-to-image with Stable Diffusion in Python
Background
Previously we saw how to implement the Stable Diffusion text-to-image model using the Python Diffusers library, which is a library for state-of-the-art pre-trained diffusion models. It is hosted by huggingface. You can also use the image-to-image pipeline to make text guided image to image generations. This is essentially using one image as a template to make another. This would be useful for converting simple sketches to refined looking artwork or concept art. Or maybe you want to constrain a particular image to a certain pose. To make this work fast enough you should have a reasonably modern graphics card.
Code
First we create the pipeline object from the diffusers library.
import os, glob
import random, math
import numpy as np
import pandas as pd
import torch
from diffusers import StableDiffusionImg2ImgPipeline, EulerDiscreteScheduler

model_id = "stabilityai/stable-diffusion-2-1"
scheduler = EulerDiscreteScheduler.from_pretrained(model_id, subfolder="scheduler")
pipe = StableDiffusionImg2ImgPipeline.from_pretrained(
    model_id, scheduler=scheduler, torch_dtype=torch.float16).to("cuda")
We can then call the pipe object to create an image from another image. The prompt function below is a convenient way to make multiple images at once and save them to the same folder with unique names. Using the same seed will ensure the same image is generated for the same prompt, so you can fix this and alter the strength only if needed.
def img2imgprompt(prompt, n=1, style=None, path='.', negative_prompt=None,
                    init_images=None, strength=0.8, guidance_scale=9, seed=None):
    """Image-to-image prompt, assumes the correct pipe object"""

    if style != None:
        prompt += ' by %s'%style
    init_images = [Image.open(image).convert("RGB").resize((768,768)) for image in init_images]
    if negative_prompt == None:
        #make this whatever you want
        negative_prompt = 'disfigured, bad anatomy, low quality, tiling, poorly drawn hands, out of frame'
    for c in range(n):
        if seed == None:
            currseed = torch.randint(0, 10000, (1,)).item()
        else:
            currseed = seed
        print (prompt, strength, currseed)
        generator = torch.Generator(device="cuda").manual_seed(currseed)
        image = pipe(prompt, negative_prompt='', image=init_images, num_inference_steps=50,
                     guidance_scale=guidance_scale, generator=generator, strength=strength).images[0]
        if not os.path.exists(path):
            os.makedirs(path)
        i=1
        imgfile = os.path.join(path,prompt[:100]+'_%02d_%d.png' %(i,currseed))
        print (imgfile)
        while os.path.exists(imgfile):
            i+=1
            imgfile = os.path.join(path,prompt[:100]+'_%02d_%d.png' %(i,currseed))
        image.save(imgfile,'png')
    return image
Example
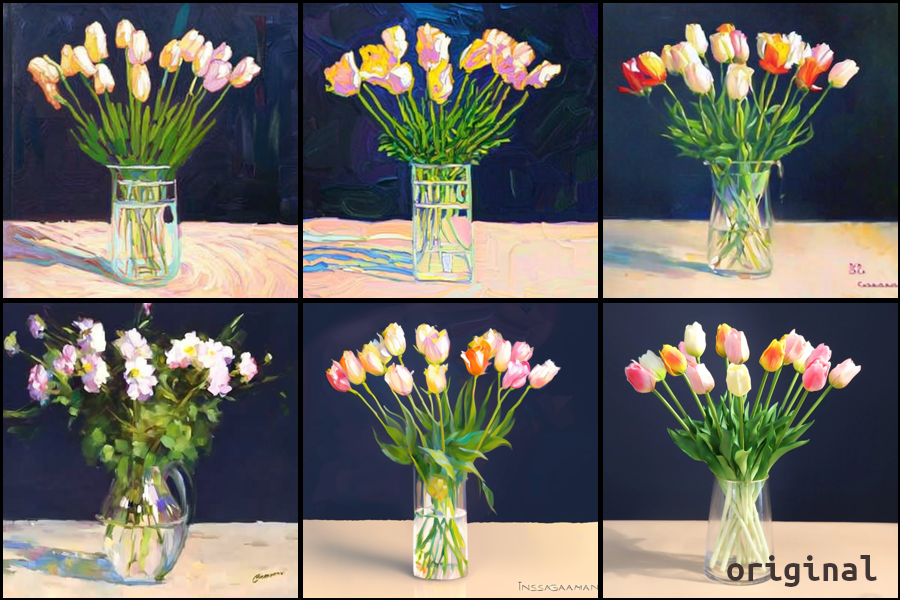
We can use a picture of some flowers as a basic example. The strength used here is 0.8 with the seed held constant whilst the prompt was altered to use varying artist styles.
Rudimentary sketches to pictures
You can turn a very simple sketch into a painting or picture with this method. Take this very simple drawing of a landscape. It is just a few areas of color outlining the sky and land. But we can turn this into convincing pictures that are still quite close to the structure of the original. The strength parameter was set to about 0.75.
Strength parameter
The strength is an important parameter which has a huge impact on the result. It determines how much the generated image resembles the initial image. A higher strength value gives the model more “creativity” to generate an image that’s different from the initial image; a strength value of 1.0 means the initial image is more or less ignored. The guidance_scale parameter is used to control how closely aligned the generated image and text prompt are. A higher guidance_scale value means your generated image is more aligned with the prompt, while a lower guidance_scale value means your generated image has more space to deviate from the prompt. See more details here.
We can see the effect of the strength parameter by keeping the seed constant as the strength is increased from a low value. In the example below the top left image has a strength of 0.1 so it’s mostly the original image. The last image is strength=0.95 and there is still a lot of compositional similarity.
Finally we can use the strength to make a morph type animation by running the same seed and then putting all the images in a gif. The command used was:
images = ['monalisa.jpg']
for s in np.arange(0.05,0.98,0.03):
    img2imgprompt('renaissance lady, evening light, high quality',
                  style='carl rungius',path='monalisa',init_images=images, strength=s)
GIF code
This is the code to make a gif using
def make_gif(path, outfile):
    """make gif from images in a folder"""

    import glob
    from PIL import Image
    files = sorted(glob.glob(path+'/*.png'))
    img = Image.open(files[0])
    images=[]
    images = [Image.open(f) for f in files]
    images[0].save(outfile,
               save_all=True, append_images=images[1:],
               optimize=False, duration=400, loop=0)
    return


